A Beginner’s Guide to ELISA: How It Works & Common Pitfalls
 Cynthia
9 min read
Cynthia
9 min read
In this Article
All of the products listed in AAA Biotech’s catalog are strictly for research-use only (RUO).
| An Overview |
|---|
|
|
|
|
|
|
Enzyme-linked immunosorbent Assay, also known as ELISA or EIA, is a plate-based assay technique developed by Swedish scientists Engvall and Perlmann in 1971. It detects and quantifies the presence of antigens, antibodies, proteins, and hormones in a biological sample, including blood, plasma, urine, saliva, and cerebrospinal fluid (CSF).
Researchers use ELISA to diagnose a wide range of conditions, ranging from bacterial and viral infections to endocrine conditions. In fact, at-home pregnancy test kits follow the ELISA principle.
ELISA Basics: What You Should Know?
ELISA is an immunoassay - a lab-based test that relies on antigen-antibody interactions in a sample. Antibodies are Y-shaped proteins that can bind specifically to antigens and form a complex structure. An antigen is a protein or sugar found on the surface of cells or a virus. It acts like a marker that antibodies can recognize.
The specificity (ability to detect the target molecule only) and sensitivity (ability to detect low levels of the target) of ELISA are very high. Thus, it can detect even low concentrations of antigens or antibodies in a sample.
It is performed in 96-well or 384-well polystyrene microplates. In the ELISA test, the antigens are immobilized to a solid surface. This is done either directly or via the use of a capture antibody itself immobilized on the surface.
After this, an enzyme-labeled antibody is used to identify a different epitope on the antigen. When a substrate is added, it produces a detectable signal, usually a color change. This signal is proportional to the amount of target analyte present in the sample.
An ELISA test kit consists of:
- Capture Antibody: Binds to the target antigen
- Detection Antibody: Identifies the epitopes on an antigen
- Enzyme Substrate: Produces a detectable signal
- Microplate Wells: The Surface where all the reactions take place.
Types of ELISA Formats
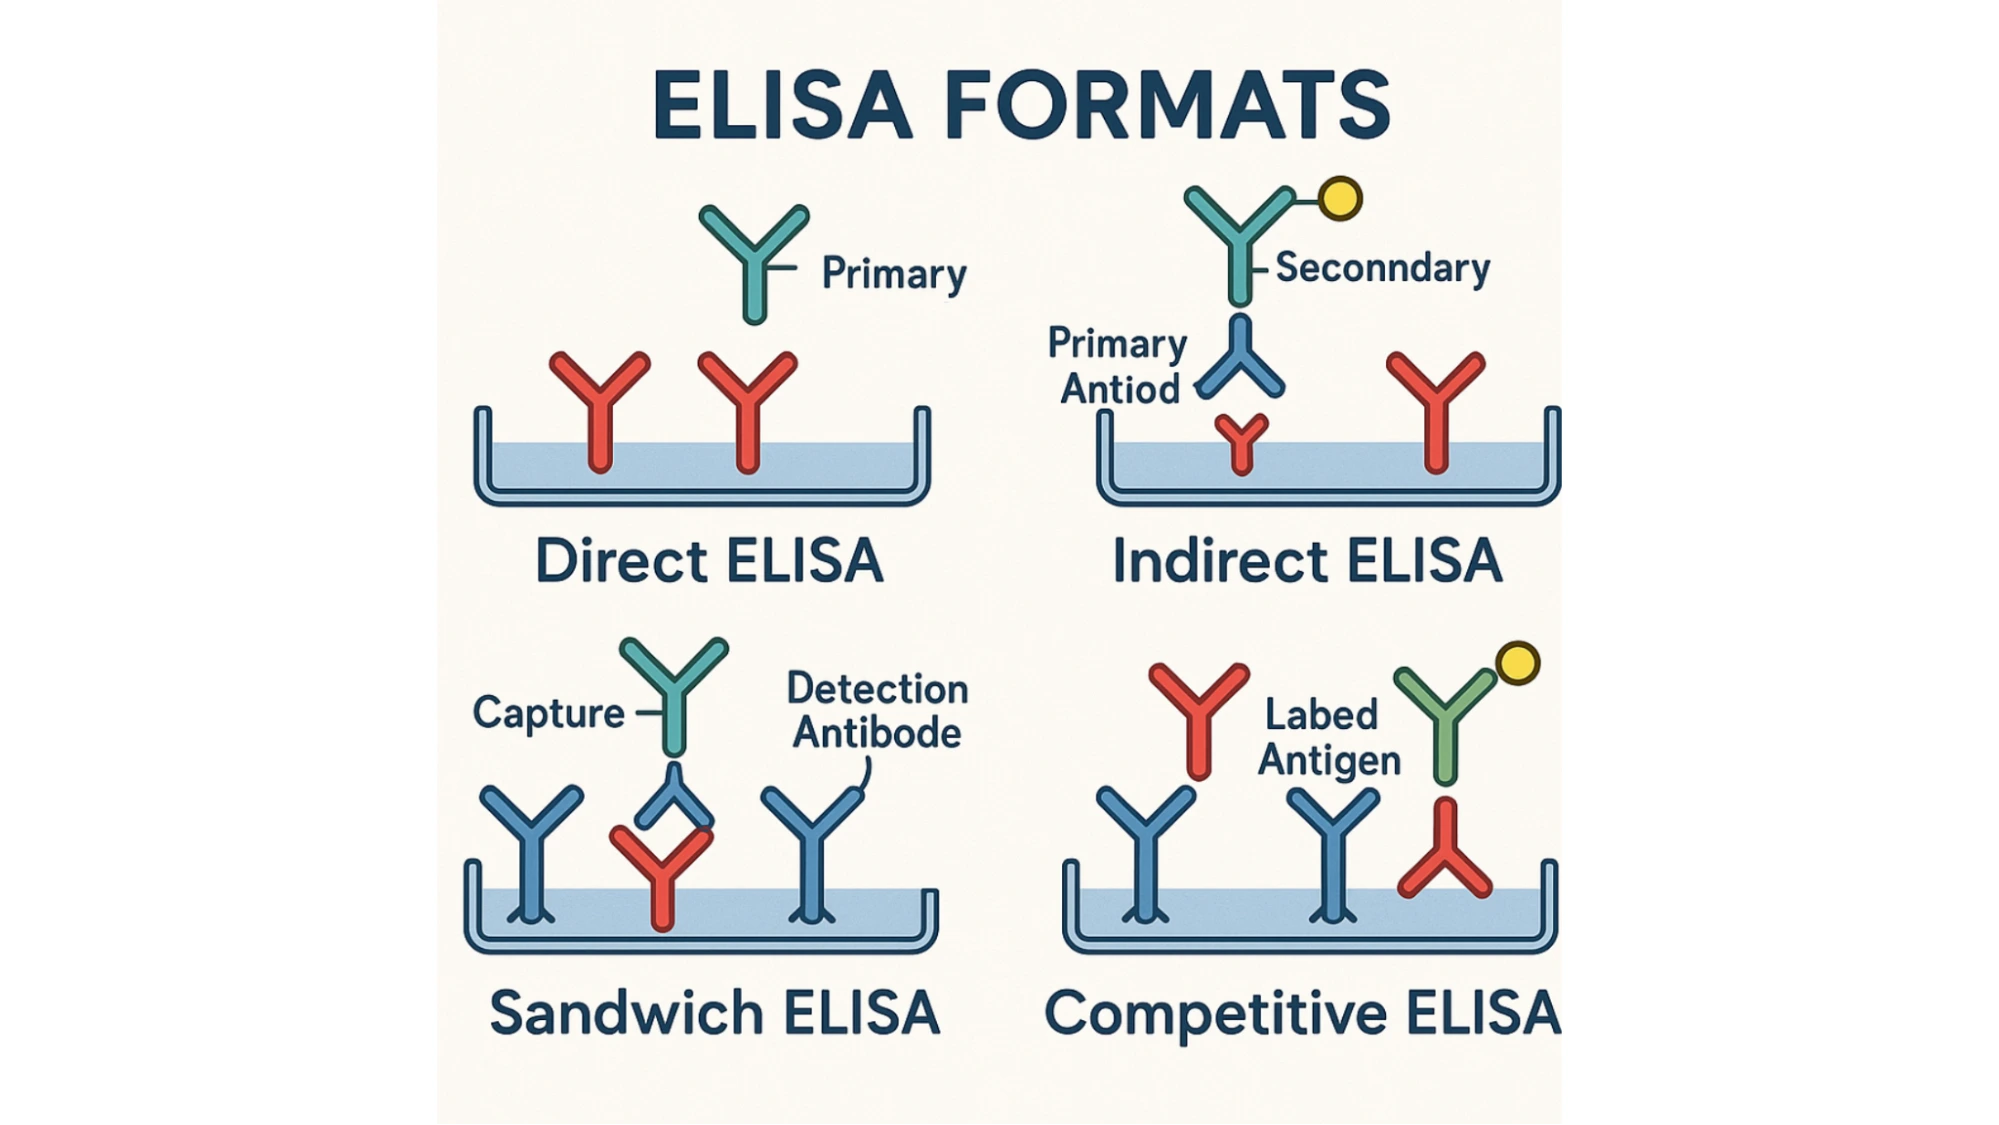
There are four types of ELISA formats:
- Direct ELISA:
It is a simple and fast method in which the antigen is immobilized on the plate and detected directly using an enzyme-conjugated primary antibody. However, this is not ideal for the detection of low-concentration antibodies.
- Indirect ELISA:
In this, the antigen is immobilized, and an enzyme-conjugated secondary antibody is used to detect the primary antibody to which the antigens bind. As a result, it amplifies the signal and has high sensitivity. However, it can lead to non-specific binding.
- Sandwich ELISA:
A capture antibody is coated on the plate, and then the antigen is added. The capture antibody binds to the antigen. A detection antibody, conjugated with an enzyme, is then applied. This forms a sandwich-like structure between two antibodies and an antigen. It has high specificity and is ideal for complex samples. However, it requires well-characterized matched antibody pairs.
- Competitive ELISA:
In this, the sample of antibodies or antigens competes with a reagent mixed with it. The amount of signal produced is inversely proportional to the amount of target protein present in the sample. It is ideal for small antigens, but the interpretation is complex.
How Does ELISA Work: Step-By-Step Explanation
The procedure for ELISA varies with the format used. Here, we will discuss the workflow for sandwich ELISA. The steps include:
- Plate Coating
i) Start with a high-binding polystyrene microplate (96- or 384-well).ii) Dilute your capture antibody (commonly 2 µg/mL in carbonate–bicarbonate buffer, pH 9.4) and add 100 µL to each well.
iii) Incubate, either overnight at 4 °C or 1–2 hours at 37 °C, to allow the antibody to passively adsorb to the plastic surface.
- Blocking
i) Remove unbound antibody and add 200 µL of blocking buffer (e.g., 1% BSA in PBS) to each well.ii) Incubate for 1 hour at room temperature.
iii) Blocking fills in any remaining protein-binding sites on the plastic. This helps reduce future background noise.
- First Wash
i) Wash the plate 3–5 times with PBS + 0.05% Tween 20 (300 µL per well).ii) Now, gently flick out the buffer each time and tap the plate on absorbent paper.
Note: Make sure the wells don’t dry out between steps.
- Adding Standards and Samples
i) Prepare a standard curve via serial dilution of known antigen concentrations in assay buffer.ii) Dilute your experimental samples (e.g., serum or culture supernatant) in the same buffer.
iii) Pipette 100 µL of standards and samples (in duplicate) into designated wells.
iv) Incubate for 2 hours at room temperature to bind antigens to the capture antibody.
- Second Wash
i) Repeat the wash procedure (5× with PBS + 0.05% Tween 20) to remove unbound proteins and sample components. - Detection Antibody
i) Dilute a matched detection antibody, either directly enzyme-conjugated or biotinylated, in incubation buffer.ii) Add 100 µL per well and incubate for 1 hour at room temperature. This antibody binds a second epitope on the captured antigen and forms a “sandwich.”
- Third Wash
i) Wash again 5 times with PBS + 0.05% Tween 20 to remove unbound detection antibody. - Enzyme Conjugate (If Needed)
i) If your detection antibody is biotinylated, add 100 µL of streptavidin–enzyme conjugate.
ii) Incubate for 1 hour at room temperature
iii) Now, wash 5 times to remove excess conjugate.
- Substrate Addition
i) For HRP detection, add 100 µL of TMB substrate and incubate for approximately 15 minutes in the dark. Now, watch the color develop from clear to blue. Stop the reaction by adding 100 µL of 0.2 M sulfuric acid, which turns yellow.Note: If using ALP, add pNPP substrate and read directly without a stop solution, usually after 30–60 minutes.
- Plate Reading
i) Measure absorbance on a plate reader:
TMB/HRP at 450 nm (with a 620–650 nm reference)
pNPP/ALP at 405 nm (with reference)ii) Record readings within 15 minutes for HRP assays to get accurate quantification.
- Data Analysis
i) Subtract blank and reference readings from all ODs.ii) Plot your standard curve of OD versus known concentration.
iii) Interpolate sample ODs to determine analyte levels, and then factor in any dilution to report final concentrations.
With these steps, you’ll achieve a sensitive and specific measurement of your target molecule.
What Are The Different Applications of ELISA in Research?
Diagnose and Monitor Diseases
1. Infectious Diseases:
Pathogens, like HIV, hepatitis A, B, C, and influenza, can lead to infectious diseases. ELISA detects antibodies against these pathogens. It further helps diagnose and monitor disease progression.
2. Cancer:
Tumor markers, such as PSA and CEA, play an important role in cancer diagnosis and monitoring. ELISA is also used to detect these markers.
3. Real-Time Outbreak Tracking:
During epidemics, including COVID-19, ELISA-based testing kits increasingly screen populations for antibodies. It helps with making informed decisions and checking the vaccine's efficacy.
4. Autoimmune Diseases:
When our immune system attacks healthy cells and tissues, it causes inflammation and damage. ELISA detects these issues by measuring the concentration of autoantibodies such as -
- Anti-dsDNA
- Anti-dsg1
- ANA.
Food Safety
1. Food Allergen Detection:
Food allergens in various food products can lead to various health issues. So, ELISA is used to detect these allergens and ensure food safety.
2. Monitoring Food Quality:
ELISA can help ensure the quality of food by identifying different allergens, contaminants, and toxins in a food product.
Drug Discovery and Development
1. Monitor Drug Concentration
ELISA helps monitor drug concentration in patients with rheumatoid arthritis and inflammatory bowel diseases.
Additional Applications
1. Hormone Level Detection
ELISA can be used to detect and measure hormone levels, such as hCG, testosterone, prolactin, etc.
2. Forensic Science
It is also used to detect and quantify organic substances in a sample.
3. Environmental Monitoring
Pollutants in the air and soil can harm our environment. So, ELISA is used to detect heavy metals, pesticides and pathogens in air and soil.
Common Issues in ELISA and How to Fix Them
When it comes to performing ELISA, it requires multiple assay components and steps. So, there is a high chance of errors that may lead to inaccurate results. So, here are the common sources of problems during assay development.
| Problem | Possible Causes | Solution |
|---|---|---|
| Weak or No Signal |
|
|
| High Background Noise |
|
|
| Poor Standard Curve |
|
|
| Poor Replicate Data |
|
|
| Assay Variability |
|
|
| Edge Effects |
|
|
The Bottom Line
ELISA is a powerful technique used in various applications. Whether you need it for drug development, food safety, or biological research, ELISA kits provide outstanding specificity, sensitivity, and accuracy.
However, remember that, like any other technique, ELISA can have some issues that can be resolved with understanding the causes that can lead to wrong results.
Now that you know what ELISA is, how it works, what its applications are, and more, what are you waiting for? Find a reliable supplier of ELISA test kits, like AAA Biotech, that can provide you with high-quality ELISA kits that can support your research.
Lead Clinical Research Coordinator (LCRC)
Cynthia Lee is the President of AAA Biotech and specializes in understanding highly validated and characterized monoclonal/polyclonal antibodies, recombinant proteins, and ELISA kits.