How to Design an ELISA Experiment: Step-by-Step Guide
 Cynthia
6 min read
Cynthia
6 min read
In this Article
All of the products listed in AAA Biotech’s catalog are strictly for research-use only (RUO).
Key Takeaways
- ELISA experiment design demands precision throughout, from antibody pair selection to sample prep and signal detection.
- Sandwich ELISA offers the highest sensitivity by using two antibodies targeting distinct antigen epitopes.
- Optimal antibody concentrations and high-binding polystyrene plates improve assay performance and reproducibility.
- Proper blocking, washing, and incubation steps minimize background and ensure specific binding.
- Accurate sample dilution, standard curve preparation, and plate layout are critical to reliable data interpretation.
- Assay optimization (checkerboard titrations, controls, spike/recovery) and preventing plate drying ensure reproducibility and assay success.
ELISA (Enzyme-Linked Immunosorbent Assay) is the gold standard of protein detection and quantification, and is also used for quantification of other biomolecules such as antibodies, hormones, and various biomarkers.
ELISA experiment design requires accuracy in all stages, including in antibody pair selection, plate organization, sample preparation, and signal detection.
Thoughtful ELISA experiment design will result in sensitive, reliable, and reproducible results for any clinical, research, or quality control requirements. Regardless of whether you’re developing an ELISA protocol from scratch or improving an existing one, it should always be the goal to optimize each step to achieve the best results possible.
ELISA Basics Guide: Principles and Applications
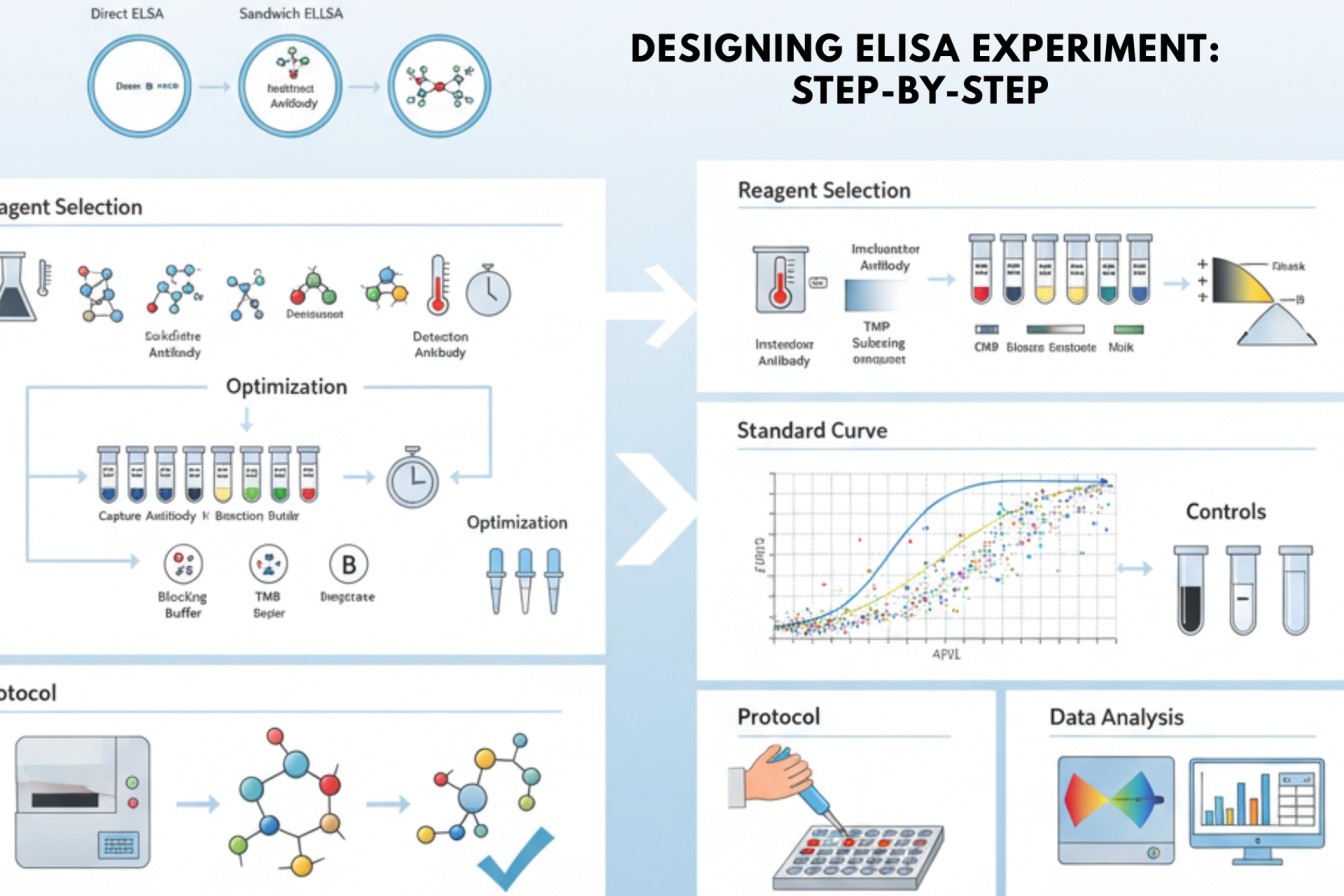
ELISA is based on antigen-antibody interaction, which subsequently allows for quantification of the signal via the reaction of color-producing enzymes. The most utilized ELISA formats include “direct”, “indirect”, “sandwich”, and “competitive” ELISA, with each possessing different experimental requirements and detection principles.
NOTE: Sandwich ELISA has the highest sensitivity and specificity, which are associated with the utilization of two antibodies (capture and detection) for binding separate epitopes of antigens.
Overall Workflow:
Critical Steps of ELISA Workflow
There are a roughly 10 critical steps to promote and ensure the assay’s success with reliable results.
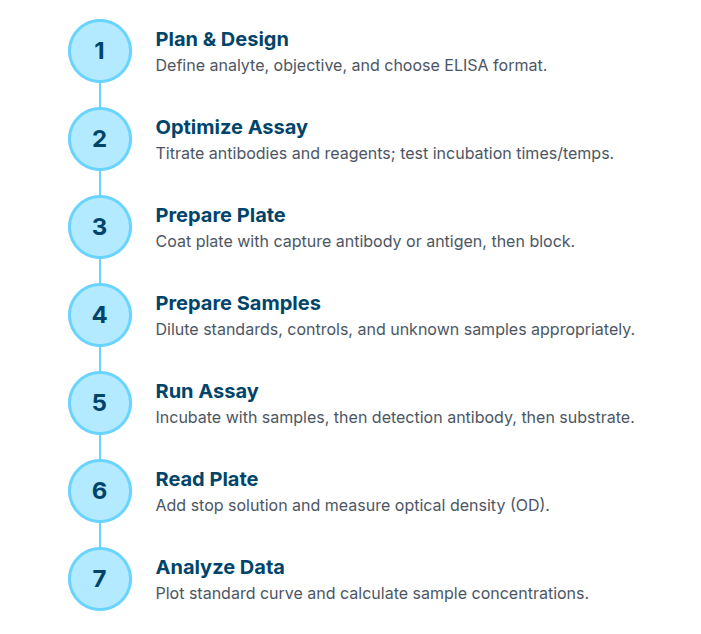
Step 1: Set Objectives and Format of the Experiment
Key Decisions:
- Choose the type of ELISA (ie: sandwich, for complex or low-abundant samples).
- Determine your analyte of interest and the range of detection that you need.
Step 2: Antibody Pair and Type of Plate
- Capture Antibody: Has high affinity, is epitope-specific, preferably is monoclonal.
- Detection Antibody: Identifies a different epitope, and should not be cross-reactive with the capture antibody (ideally produced in a different host).
Antibody Optimization:
- Titrate the two antibodies with the help of checkerboard assays to elucidate the optimal concentration ranges.
- Normal/typical coating concentrations are 0.5–4ug/ml to capture; 0.5 -1ug/ml to detect.
- Selection of Plate: High-binding polystyrene ELISA plates are to be used in order to adsorb antibodies effectively.
- Pre-coated plates are time-saving and enhance the reproducibility of high-throughput laboratories.
Step 3: Coating Plates
- Add diluted capture antibody as suggested (usually 2ug/ml in PBS, 100 ul/well).
- Incubate overnight at 4–8°C or 2 hours at 37 °C if time is limited.
Tips:
- Do not introduce bubbles – these can cause uneven effects.
- Apply sealing “plate-sealer” during incubation and label strip plates in order to avoid mixing/contamination.
Step 4: Blocking
- 200 µl blocking buffer (1–5% BSA or non-fat dry milk in PBS, often with 0.05% Tween 20).
- Incubate for 1-2 hours at room temperature.
- Wash 3-5 times using PBST (PBS + 0.05% Tween 20) in order to eliminate surplus blocking material.
Optimization Tips:
- Phosphorylated/biotinylated molecules can potentially be adsorbed to plate if milk is used.
- Plate wells should be saturated by blocking them completely.
Step 5: Preparation of Samples and Standards
- Make serial dilutions of antigen standards (e.g., 0-1000 pg/ml) in your test sample matrix (PBS + 1% BSA in serum-free, or diluted serum/biological fluids).
- Centrifuge biological samples at 10,000 x g for 10 minutes to eliminate debris.
- Sample dilution: 1:2 to 1:100 - pretest to see if you can determine an optimizing dilution factor to bring samples within the “normal range” of the standard curve.
- Standards should be prepared essentially immediately prior to usage; any aliquots should be stored at -80°C.
Controls:
- Try to always have blank wells, negative controls (only buffer, usually), and wells for measuring “background”.
Step 6: Sample Incubation
- Add 100 µl prepared standard or sample to the wells.
- Seal plates and incubate at 37°C (or overnight at 4°C to increase sensitivity).
Washing:
- Incubate and wash 3-5 times with PBST to remove unbound antigens and contaminants/debris.
Step 7: Detection Antibody Incubation
- In the case of direct detection, an enzyme-conjugated antibody of 0.5-2 µg/ml is used in the blocking buffer.
- For indirect: unlabeled detection antibody, followed by species-specific secondary antibody; secondary antibody is typically diluted 1:5,000 – 1:20,000.
- Incubate the detection antibody for 1-2 hours at 37°C. If indirect, incubate the secondary antibody for 1 hour.
- Wash (3-5 times after incubation).
Step 8: Addition of Enzyme & Substrate
- Add streptavidin-enzyme conjugate (if biotinylated antibody system; e.g., SA-HRP or SA-ALP) and incubate for 1 hour at room temperature.
- Wash again.
- Add 100 µl substrate (TMB for HRP, pNPP for ALP) per well.
- Incubate, protect from light (TMB: 10–30 min; ALP: up to 60 min).
- For colorimetric assays, add stop solution (50–100 µl of 1M H₂SO₄ for TMB).
- Read absorbance at 450 nm (TMB) or 405 nm (PNPP).
Step 9: ELISA Plate Setup Guide & Data Interpretation
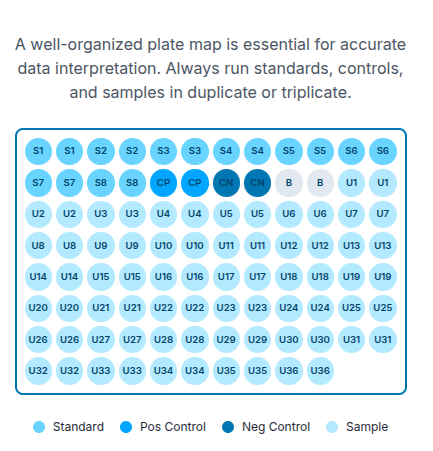
- Make sure the plate layout has accommodations for standards, duplicates, blanks, and controls.
- Press the plate firmly and make sure it is properly seated in the reader.
Interpreting
Data: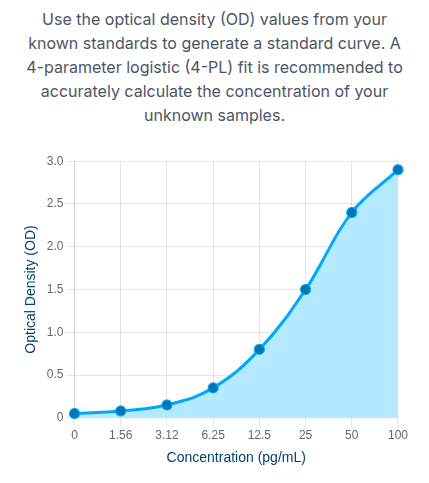
- OD of blank/reference is subtracted from all wells.
- For high accuracy, construct standard curves with 4- or 5-parameter regression.
- Extrapolate the concentration of the sample, and apply the dilution factor.
- If OD is out of range, re-run the sample at an alternate dilution.
Step 10: ELISA Assays Optimization
- Selection of antibody, enzyme, and substrate - use checkerboard titrations.
- Check reproducibility by replicating plates and changing batches of reagents.
- Include positive/negative controls, range-finding tests (spike/recovery, dilution linearity).
- Optimize blocking buffer and washing steps to minimize background.
Problem-Solving and Best Practices
- Never allow the plate to become dry between steps; it will promote nonspecific binding.
- Add reagents with multichannel pipettes, as it minimizes errors caused via timing.
- Avoid excessive Tween 20; it may strip weakly bound antibodies.
- Always check the compatibility of enzymes and substrates (HRP-TMB or ALP-pNPP).
Final Thoughts
Proper ELISA experimental design involves the thoughtful combination of user technique, the selection of reagents, and the optimization of the assay itself.
The design of the ELISA assay is based on the utilization of optimized reagents, accurate pipetting, prudent plate configuration, and strict data interpretation, which increases the reliability of the experimental protocol used for each plate.
Faq's
How do I choose the optimal antibody pair for my ELISA experiment?
Select monoclonal antibodies recognizing separate epitopes; validate specificity and affinity by empirical titration.
Which is the most appropriate blocking buffer for sandwich ELISA?
BSA (1–5% in PBS) is generally optimal for most targets; use non-fat dry milk only when phosphorylation or biotinylation is not relevant to experimental goals.
How can I troubleshoot high background in my ELISA results?
Increase care during washing steps, and check blocking buffer efficiency. Indicate if any liquid is left after use in wells, and reduce the time that plates sit out and are not being actively washed.
Which type of plate is the best in ELISA assays?
High-binding polystyrene plates are preferred; pre-coated plates enhance precision and save time in routine workflows.
How do I interpret my ELISA standard curve?
Use software for 4- or 5-parameter logistic curve fitting. Subtract blanks and reference wavelengths for extrapolating sample concentrations. Dilute and re-analyze samples outside the curve range.
Lead Clinical Research Coordinator (LCRC)
Cynthia Lee is the President of AAA Biotech and specializes in understanding highly validated and characterized monoclonal/polyclonal antibodies, recombinant proteins, and ELISA kits.